Sunday, May 27, 2012

DIY Curtain Hem

If you know how to sew, then you need to stop reading now.

But if hemming a curtain seems just out of your reach, then read on!  I promise it is not hard at all, although it takes a bit of time.  I am not a great sewer, not even a good one, and I am not gonna teach you a super professional way to whip up a hem.  But my method works and is especially useful if you are of the not so patient variety.

My hemming project is to shorten the curtains in my oldest's room.  He has 6 altogether and their length was making the whole room feel heavy.


Step One
Wash and dry the curtains in question.

Step Two
Iron.

One
Two


Step Three
Rehang the curtain.

Step Four
Mark where you want the bottom of the curtain to hang to.  You should really pop a pin in, but I just hold it in that spot.

Three
Four


Step Five
Fold the curtain up at the mark and double check that it is straight by comparing the fold at both ends of the curtain.

Step Six
Iron the fold.

Five
Six


Step Seven
Cut off the excess fabric leaving enough to turn under.

Step Eight
Take a minute to fold up the excess as you go so that if you are doing a big job you don't have a whole bunch of clean up at the end.

Seven
Eight


Step Nine
Fold fabric under.  You should really use pins here too but I hate them so I just make sure to hold the fold in place.

Step Ten
Sew alone the top edge of the fold.

Nine
Ten


Step Eleven
Don't forget to do a little reverse at the beginning and end of your hem.

Step Twelve
Put up your first curtain to make sure it hangs at the right spot.  If it does, use it as a guide to measure the rest.

Eleven 
Twelve


And there you have it.
Easy, breezy.


Monday, May 21, 2012

DIY Outdoor Space

As you may remember, over the winter we got a new porch.  
Once the snow disappeared I wanted to start using it.


Step One - Find Furniture
I started looking for some furniture.  There is a huge variety of outdoor stuff and much of it is really gorgeous.  But, also really expensive.  And depending on your space, you really need to find something that is the appropriate scale.  I kept seeing these super cute little wicker sets but they were all so teeny...like for an apartment balcony perhaps.  Finally I found a good sized wooden couch on Kijiji.  

This is the couch with the original cushion fabric.  It was also a different colour when I bought it but I painted it with some old paint I had in storage.  If you can use what you already have it cuts down on cost.


Step Two - Make it Your Own
Recovering the cushions was not as hard as it may sound.  I am not a sewer...I can manage a straight line but that's about it.  So believe me, if I did it, you can too.

First cut your fabric so that it will go around the cushion.

Outdoor fabric.

Next, sew the side and one end so you end up with a big pillow case.  Turn it right side out and put the cushion in.


Sew up the end with a fancy disappearing stitch.  I dunno what you really call it and I am sure that sewers with real talent have got tutorials on the internet that you can check out if you aren't familiar with it.


I covered 3 toss cushions that I wasn't using anywhere with the same method, also with outdoor fabric.


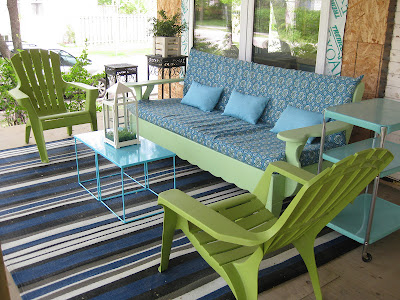
The finished product.


Step Three - Accessorize
I shopped around and to find some faux Adirondacks at a great price that would match up with my couch.  The outdoor carpet is from Walmart and was an amazing price also.


I found this cutie for free on give away weekend.


My son dragged this home from our back lane.  I sprayed it black.


Everything else I accessorized with I shopped the house for.  I had a little turquoise cafe set already so I had it in mind when I was choosing colours for the rest of the porch.

Now.  Let's stop a moment.  We are in reno right now so our house still looks...well, bad.  We have no siding yet, we have no yard yet, we have no sidewalk yet.  And the porch is not done...no railing built, etc., etc. but if you wait until everything is perfect before you use your space...well, it just seems to me like a waste.  So, nope, it is not perfect up there on the porch.


Step Four - Swallow Your Pride
But there is no reason why you can't make an imperfect space useable...and even pretty.


Total cost?  $169

couch - $40
fabric - $55
paint - free
carpet - $40
Adirondack chairs - $17 each
cart and plant stand - free
All other items were previously owned.

So shop around for deals.  Use what you already have.  Watch for freebies. 
Enjoy!!


Wednesday, May 16, 2012

Four

And the fourth way to whip up a fab chalkboard?  
FREE off someone's lawn the morning after give away weekend.


Oh. Yah. Baby.

Watch for the next DIY on Victoria Monday and happy weekend everyone!

Sunday, May 13, 2012

DIY Chalkboard

Chalkboards are everywhere in decor these days, from paper thin vinyl ones you stick on your wall to backsplashes.  I love them.  So fun to leave little messages here and there.

Here are 3 quick and easy ways to whip one up.

One
This little guy can be purchased from Dollarama.  All you need to do is paint the frame and hang it up...cute with a pretty ribbon to hang it from.  Or, you could pop off the wood edges and reframe it.

Original frame painted.
Reframed


I use mine as part of a collage in my bedroom.


Two
When the glass in this frame broke I just painted the backing of the frame with chalkboard paint. 
We keep it in the kids' hallway to give them little notes and reminders.


Three
You can see how I earmarked this page in my Style at Home magazine.  I love this board.


So I took this empty frame off my wall.


I sprayed it black matte, measured it and got a board cut to size at Home Depot.  I painted the board with my chalkboard paint and then, and here is where my DIY changes to DIWYHH (do it with your husband's help), Dino secured it in the frame.


Paint a whole wall in a kid's room or measure out a square on the wall and paint in a chalkboard menu planner in your kitchen...there are all sorts of ways to add some blackboard into your home.

Happy Mother's Day Everyone!

Sunday, May 6, 2012

DIY Accent Chair

Awhile back House and Home magazine featured Tommy Smythe's top 3 picks for an occasional chair.


Perty.  
And with price tags from $400 - $3200...expensive.

This little baby was $8.


Okay, at first glance maybe, not pretty...but it has good bones.  And fine, it has no arms, but still...$3200 for a CHAIR?  

An accent chair is a handy way to bring colour into a room.  It can be used as extra seating in a pinch or you can pop a tray on top and use it as a side table.
Keep your eyes open at thrift stores, get on Kijiji, watch the back lane, or search out your basement and let's get started!


Step One:
Turn your chair upside down and unscrew the seat.
Step Two:
Spray!  I chose glossy black because I wanted to ground a room that has a lot of white in it.

One
Two


Step Three:
Cut your fabric so that it's big enough to wrap around the edge of the seat.

Three

Step Four:
Staples are ideal but I didn't know where Dino's gun was and when I went to get furniture tacks I was all out...so I just used thumb tacks.
Step Five:
Corners can be tricky.  You can do them like you would a present, or you can just play around until you find a look you like.

Four
Five


Step Six:
Reattach the seat.

Six

Ta DA!  


And the beauty of my $8 thrift store chair is that some day, if I should decide that I prefer lime green paint and toile fabric, I can just switch it up again.

If at any point during May's DIY tutorials you have questions, please ask.  I am going easy on the details so that you don't feel overwhelmed, but if you need more information just say the word.

Wednesday, May 2, 2012

Organizing Jobs Lasting Longer Than Thirty Minutes

I would have loved to have organized my pantry during April's 30 minute projects, but, I figured it would take 30 x ummmm, a lot of minutes.


Disaster.  I know.  
But Dino finished a second storage room in our basement so the plan was to move rarely used items down there, and then organize the pantry in our dining room to be a lot more user friendly.


So I bought some Dollarama bins.


Then I took everything that we still want, but don't often use, downstairs.


Then I started sorting.  


I had been keeping serving trays stacked in the bottom of my china cabinet.  It was not efficient at all so I really wanted to get them out of there and store them in the dining room pantry as well.


I used an old office file holder and a bread cutting board to stand them on my shelf.


It was fun to put stuff in bins...so much more easily accessible than stuff had been.  


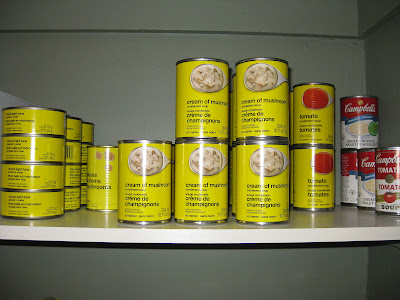
How do you like my Sleeping With the Enemy-esque can shelf? 


Still lots of room in the basement pantry.


And completely enjoying the dining room pantry now.


Well worth the time it took!

After
Before


I have decided to designate May as DIY month.  
I will post a new project for each Sunday in the month.
Get your spray paint ready!